How (and Why) I Built an AI Assistant
This article is an honest account of the process on why I built a custom AI assistant instead of just paying for one, what the architecture looks like, the actual code, what broke, and what it does now that I genuinely rely on.

# Introduction
It started with a Tuesday that completely got away from me. I had three client briefs to summarize, a backlog of research tabs I kept promising myself I'd get to, a few emails that needed thoughtful replies, and a half-written technical document sitting open in one tab for the better part of four days. By the time I looked up from context-switching between all of it, it was past 7 PM and I'd shipped almost nothing meaningful.
That evening, instead of closing my laptop and calling it a loss, I started thinking about the problem differently. I wasn't short on time. I was short on leverage. Every task I did that day had a version of it I could have delegated to something smarter than a browser bookmark. So I started building.
This article is an honest account of that process: why I built a custom AI assistant instead of just paying for one, what the architecture looks like, the actual code, what broke, and what it does now that I genuinely rely on.
# The "Why" Comes Before the "How"
Most people who decide to build an AI assistant start by Googling "Python LangChain tutorial." That's backwards. The first question worth sitting with is: why build it at all when Siri, ChatGPT, Copilot, and a dozen other tools already exist?
The honest answer for me was control. Not in a paranoid, off-grid way, but in the practical sense that every off-the-shelf assistant is designed around someone else's assumptions about what you need. They're general-purpose by design, and general-purpose means compromises. I wanted something that knew my context, used my tone, connected to my specific tools, and stayed within a workflow I already trusted.
There's also the data question. When you use a third-party assistant, your prompts and context go through their infrastructure. For personal productivity that's arguably fine. For anything client-related or commercially sensitive, it gets murkier. Building your own means you decide where the data lives.
And then there's the learning curve argument, which I think gets undersold: you understand a tool far better when you build it yourself. When something breaks, you know where to look. When you want it to do something new, you don't wait for a product update.
The timing also made the decision easier to justify. According to MarketsandMarkets, the AI assistant market is projected to grow from \$3.35 billion in 2025 to \$21.11 billion by 2030 — a 44.5% compound annual growth rate. That kind of trajectory tells you this technology isn't a trend. It's infrastructure. Getting fluent in it now, by building rather than just consuming, puts you ahead of where most people will be in two years.
That said, building is not always the right call. If you need a quick answer engine or a writing aid that costs \$20/month, buy it. But if you want something that integrates with your actual workflow, learns from your preferences, and handles tasks in a way that's specific to how you work, that's worth building.
# Choosing the Stack
Once I committed to building, the next decision was what to build it with. Here's what I actually considered, not a generic comparison chart.
- The LLM choice came down to two serious options: OpenAI's GPT-4o and Anthropic's Claude. I tested both with the same prompts across research, writing, and reasoning tasks. GPT-4o is fast and broadly capable with a mature API. Claude handles long documents and nuanced instruction-following particularly well. I ended up going with GPT-4o as the primary model because of its tool-calling reliability and the maturity of its ecosystem, with Claude available as a fallback for certain document-heavy tasks.
- For orchestration, I chose LangChain. There's a fair amount of debate in developer circles about whether LangChain adds too much abstraction, and that criticism isn't without merit. But for a project like this — one that needs memory, tool use, and a reasoning loop — LangChain's abstractions save real time. The alternative is writing that plumbing yourself, which you can do, but it's not where your attention is best spent when you're trying to ship something functional.
- Memory was a requirement from day one. A stateless chatbot that forgets everything between sessions is useful for one-off questions. It's not useful for a genuine assistant. LangChain's
ConversationBufferMemoryworked fine for in-session context. For persistence across sessions, I used a simple SQLite-backed approach, which I'll show in the code section. - For tools, I gave the assistant the ability to search the web (via DuckDuckGo's API — no key required), read and summarize files I pass it, and call custom Python functions I've written for specific recurring tasks. This is where the real value lives: turning it from a chatbot into something that can actually do things.
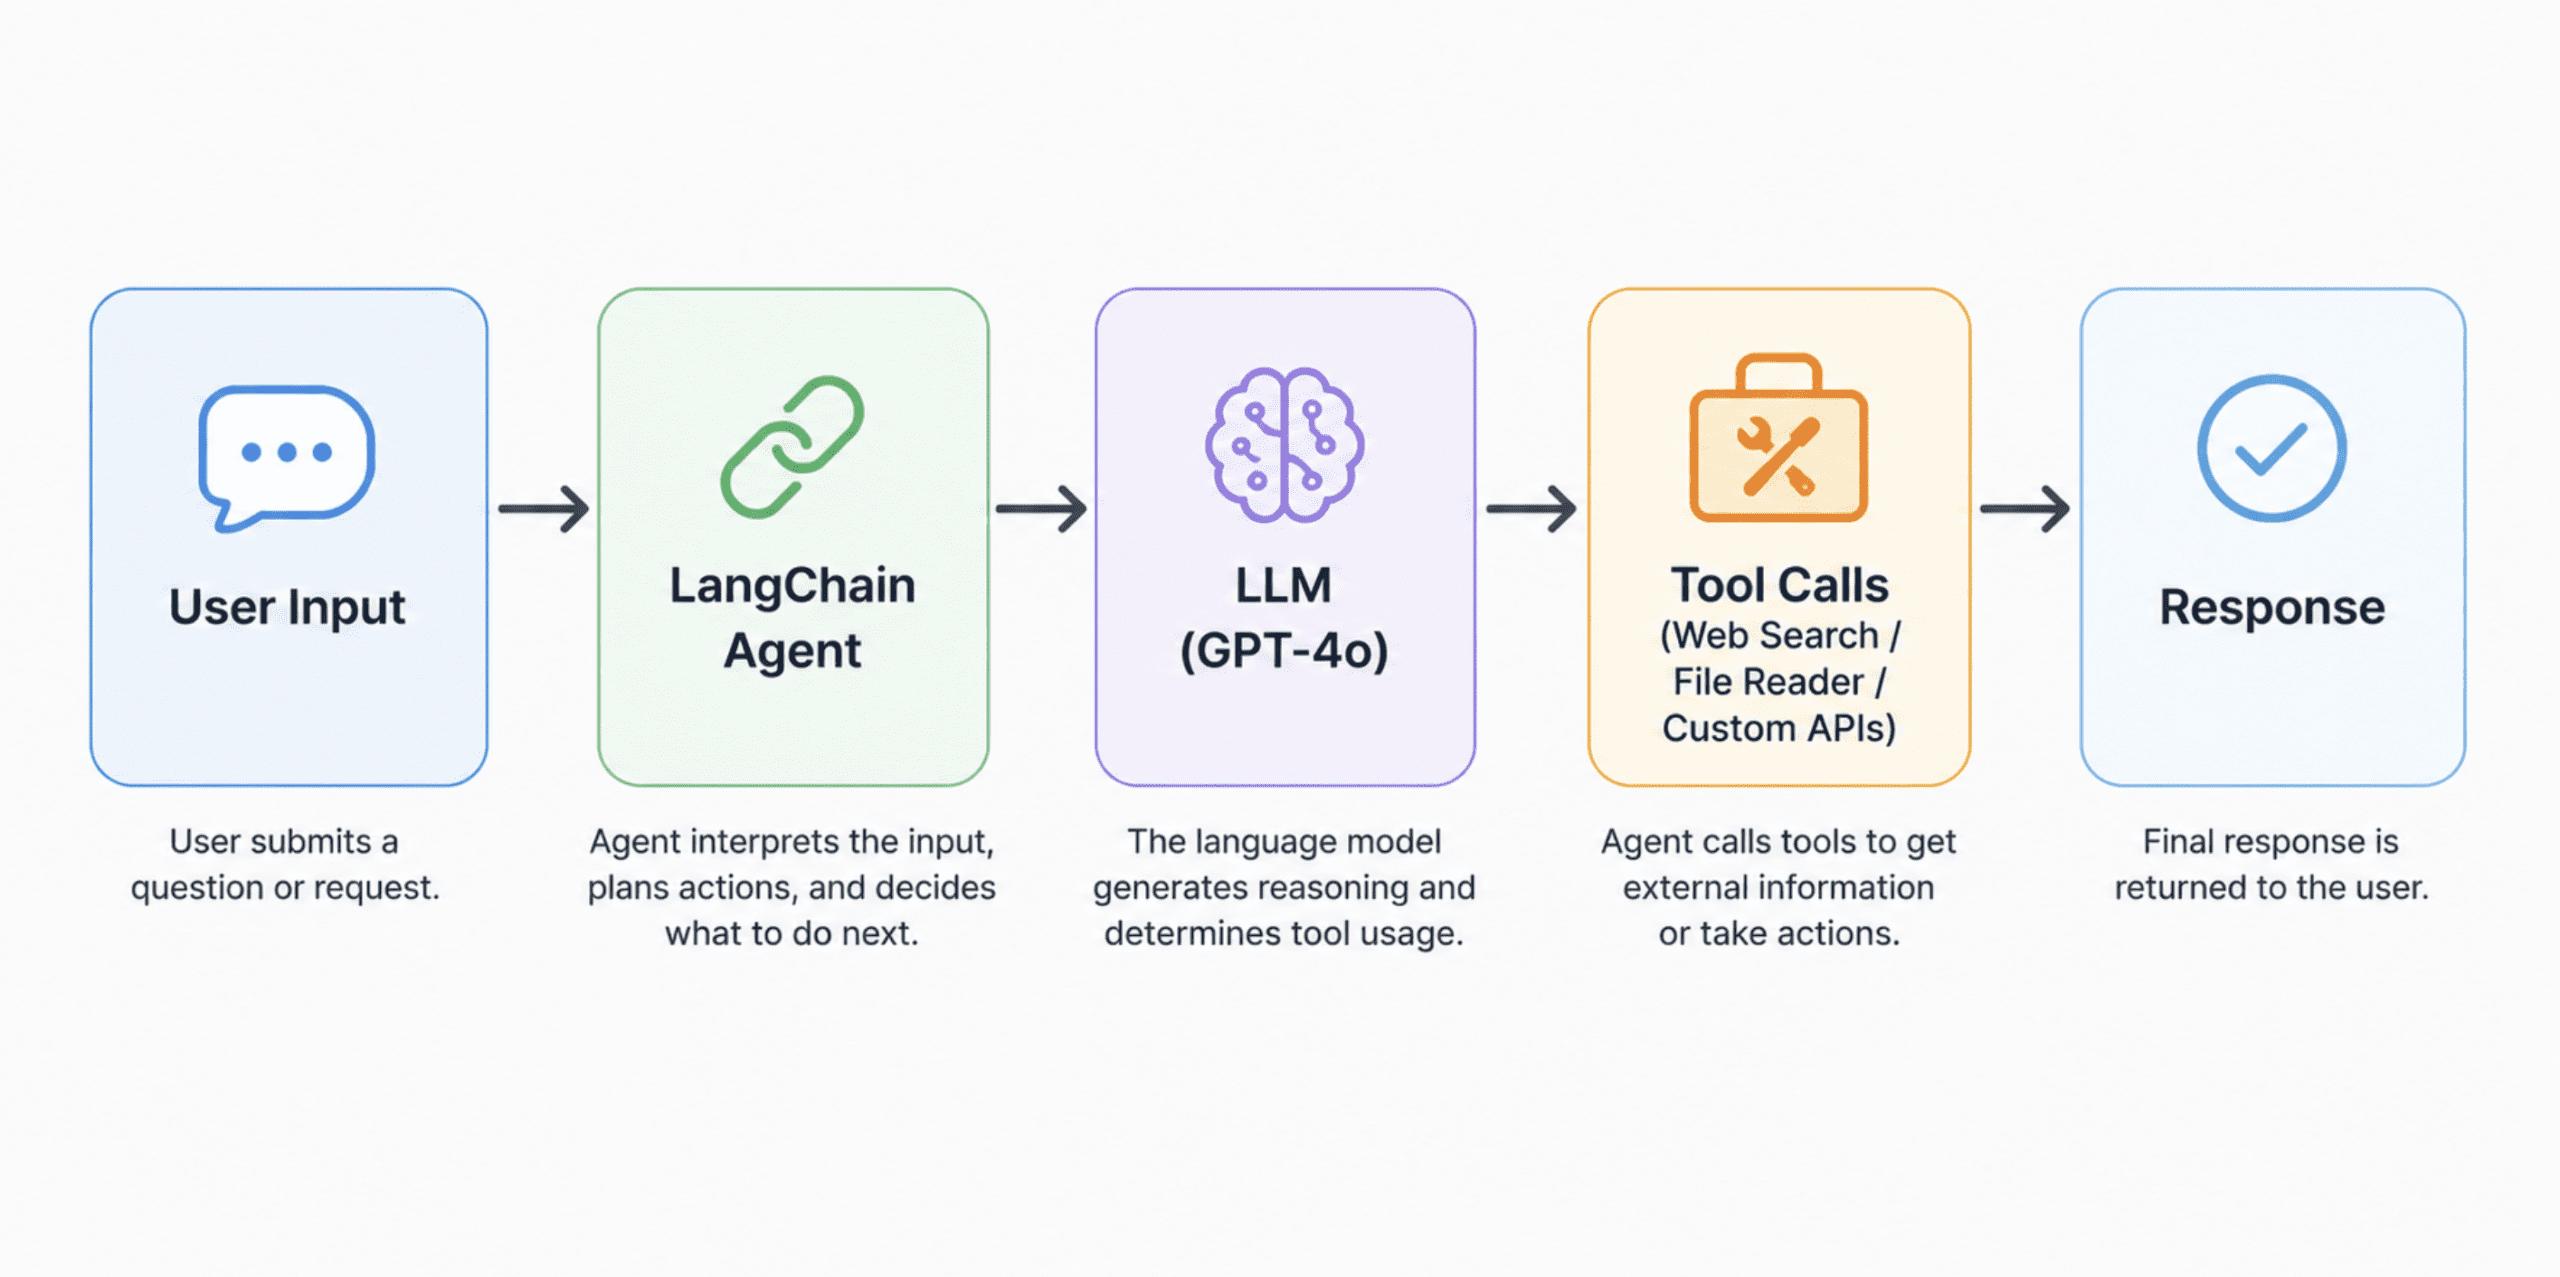
A clean horizontal architecture flow diagram of the stack
# Setting Up the Environment
Before any code runs, you need three things in order: Python 3.10 or higher, a virtual environment, and your API keys stored safely.
Step 1: Creating and Activating a Virtual Environment
# Create a virtual environment named 'assistant_env'
python -m venv assistant_env

# Activate it on macOS/Linux
source assistant_env/bin/activate

# Activate it on Windows
assistant_env\Scripts\activate
A virtual environment keeps your project's dependencies isolated from everything else on your machine. This matters more than it sounds — dependency conflicts between projects are a common, silent source of bugs.
Step 2: Installing the Required Packages
pip install langchain==0.3.0 \
            langchain-openai \
            langchain-community \
            langgraph \
            duckduckgo-search \
            python-dotenv \
            pydantic \
            requests
Here's what each package is doing:
langchainis the core framework that connects your LLM, memory, and tools.langchain-openaiis the specific connector for OpenAI's models.langchain-communitygives you access to community-built tools and integrations, including DuckDuckGo search.langgraphhandles more complex, stateful agent workflows.duckduckgo-searchlets the assistant search the web without needing an API key.python-dotenvloads your API keys from a.envfile instead of hardcoding them.pydantichandles data validation for structured inputs and outputs.
Step 3: Storing Your API Keys Securely
Never hardcode an API key directly into your script. Create a .env file in your project root:
# .env file -- never commit this to version control
OPENAI_API_KEY=your_openai_key_here
Then add .env to your .gitignore file immediately:
# .gitignore
.env
assistant_env/
__pycache__/
# Building the Core Assistant
This is where it comes together. I'll walk through each component in the order it needs to be built.
- Connecting to the LLM
# assistant.py

import os
from dotenv import load_dotenv
from langchain_openai import ChatOpenAI

# Load environment variables from the .env file
load_dotenv()

# Initialize the language model
# temperature controls randomness: 0 = focused and deterministic, 1 = more creative
# For an assistant that needs to be accurate and consistent, keep this low (0.1 to 0.3)
llm = ChatOpenAI(
    model="gpt-4o",
    temperature=0.2,
    api_key=os.getenv("OPENAI_API_KEY")
)
What this does:
ChatOpenAIcreates a connection to GPT-4o through the API. Thetemperatureparameter is worth understanding: at 0, the model always picks the most probable next token, which produces very consistent but sometimes rigid output. At 1, it's much more varied and creative. For a task-focused assistant, staying between 0.1 and 0.3 gives you reliability without losing all the natural language quality. - Designing the System Prompt
The system prompt is the most underrated part of the whole build. It defines your assistant's personality, its constraints, and how it handles ambiguous situations. Spend more time here than you think you need to.
# The system prompt acts as your assistant's standing instructions.
# It's sent at the start of every conversation to anchor its behavior.

SYSTEM_PROMPT = """
You are a focused, reliable personal assistant.

Your job is to help the user research topics, summarize documents,
draft written content, and handle structured tasks. You always:

- Give direct answers before elaborating
- Say when you're unsure rather than guessing
- Ask for clarification if a task is genuinely ambiguous
- Keep responses concise unless detail is explicitly requested

You have access to web search and can read files the user provides.
When using these tools, always cite where you got your information.

Do not make up facts, invent citations, or fill gaps with plausible-sounding fiction.
"""
What this does: This prompt is sent ahead of every conversation. Think of it as the job description you'd give a human assistant on their first day. The more specific it is, the less you'll have to correct the model mid-conversation. Vague instructions produce vague behavior, every time.
- Adding Memory
Without memory, your assistant forgets everything the moment you start a new message. This is how you fix that.
from langchain.memory import ConversationBufferMemory
from langchain_community.chat_message_histories import SQLChatMessageHistory

# SQLChatMessageHistory stores conversation history in a local SQLite database.
# The session_id lets you maintain separate memory threads (e.g. one per project).
message_history = SQLChatMessageHistory(
    session_id="main_session",
    connection_string="sqlite:///assistant_memory.db"
)

# ConversationBufferMemory wraps the message history and feeds it to the LLM
# on each turn so the model knows what was said before.
memory = ConversationBufferMemory(
    memory_key="chat_history",
    chat_memory=message_history,
    return_messages=True
)
What this does:
SQLChatMessageHistorysaves every exchange to a local SQLite file calledassistant_memory.db. This means your assistant remembers context between sessions. Thesession_idis just a label — you can create multiple sessions for different projects or topics, and they stay completely separate from each other.One caveat: buffer memory stores the full history and will eventually hit the model's context limit on long conversations. For production use,
ConversationSummaryMemoryis a better choice — it compresses older history into a summary so you stay within token limits. - Giving It Tools
This is what separates a chatbot from an assistant. Tools let the model take real actions.
from langchain.agents import AgentExecutor, create_openai_tools_agent
from langchain_community.tools import DuckDuckGoSearchRun
from langchain.tools import tool
from langchain_core.prompts import ChatPromptTemplate, MessagesPlaceholder

# Tool 1: Web search via DuckDuckGo -- no API key required
search_tool = DuckDuckGoSearchRun()

# Tool 2: A custom file reader you define yourself
# The @tool decorator registers this function as something the agent can call
@tool
def read_file(file_path: str) -> str:
    """
    Reads a text file from the given path and returns its contents.
    Use this when the user asks you to read, analyze, or summarize a file.
    """
    try:
        with open(file_path, "r", encoding="utf-8") as f:
            return f.read()
    except FileNotFoundError:
        return f"File not found: {file_path}"
    except Exception as e:
        return f"Error reading file: {str(e)}"

# Register the tools the agent can use
tools = [search_tool, read_file]

# Build the prompt template
# MessagesPlaceholder slots in the memory (chat history) and the agent's scratchpad
prompt = ChatPromptTemplate.from_messages([
    ("system", SYSTEM_PROMPT),
    MessagesPlaceholder(variable_name="chat_history"),
    ("human", "{input}"),
    MessagesPlaceholder(variable_name="agent_scratchpad")
])

# Create the agent -- this combines the LLM, the tools, and the prompt
agent = create_openai_tools_agent(llm, tools, prompt)

# AgentExecutor is the runtime loop: it calls the agent, runs any tools it selects,
# feeds the results back, and repeats until it has a final answer
agent_executor = AgentExecutor(
    agent=agent,
    tools=tools,
    memory=memory,
    verbose=True,      # Set to False in production; True lets you see the reasoning steps
    max_iterations=5   # Prevents the agent from running in circles on hard problems
)
What this does: The
AgentExecutoris the engine. When you send it a message, it doesn't just pass it to the LLM and return whatever comes back. It runs a loop: the model decides whether it needs to use a tool, calls the tool if so, gets the result, thinks about what to do next, and only returns a final answer when it's satisfied. This is the ReAct (Reasoning + Acting) pattern in practice.
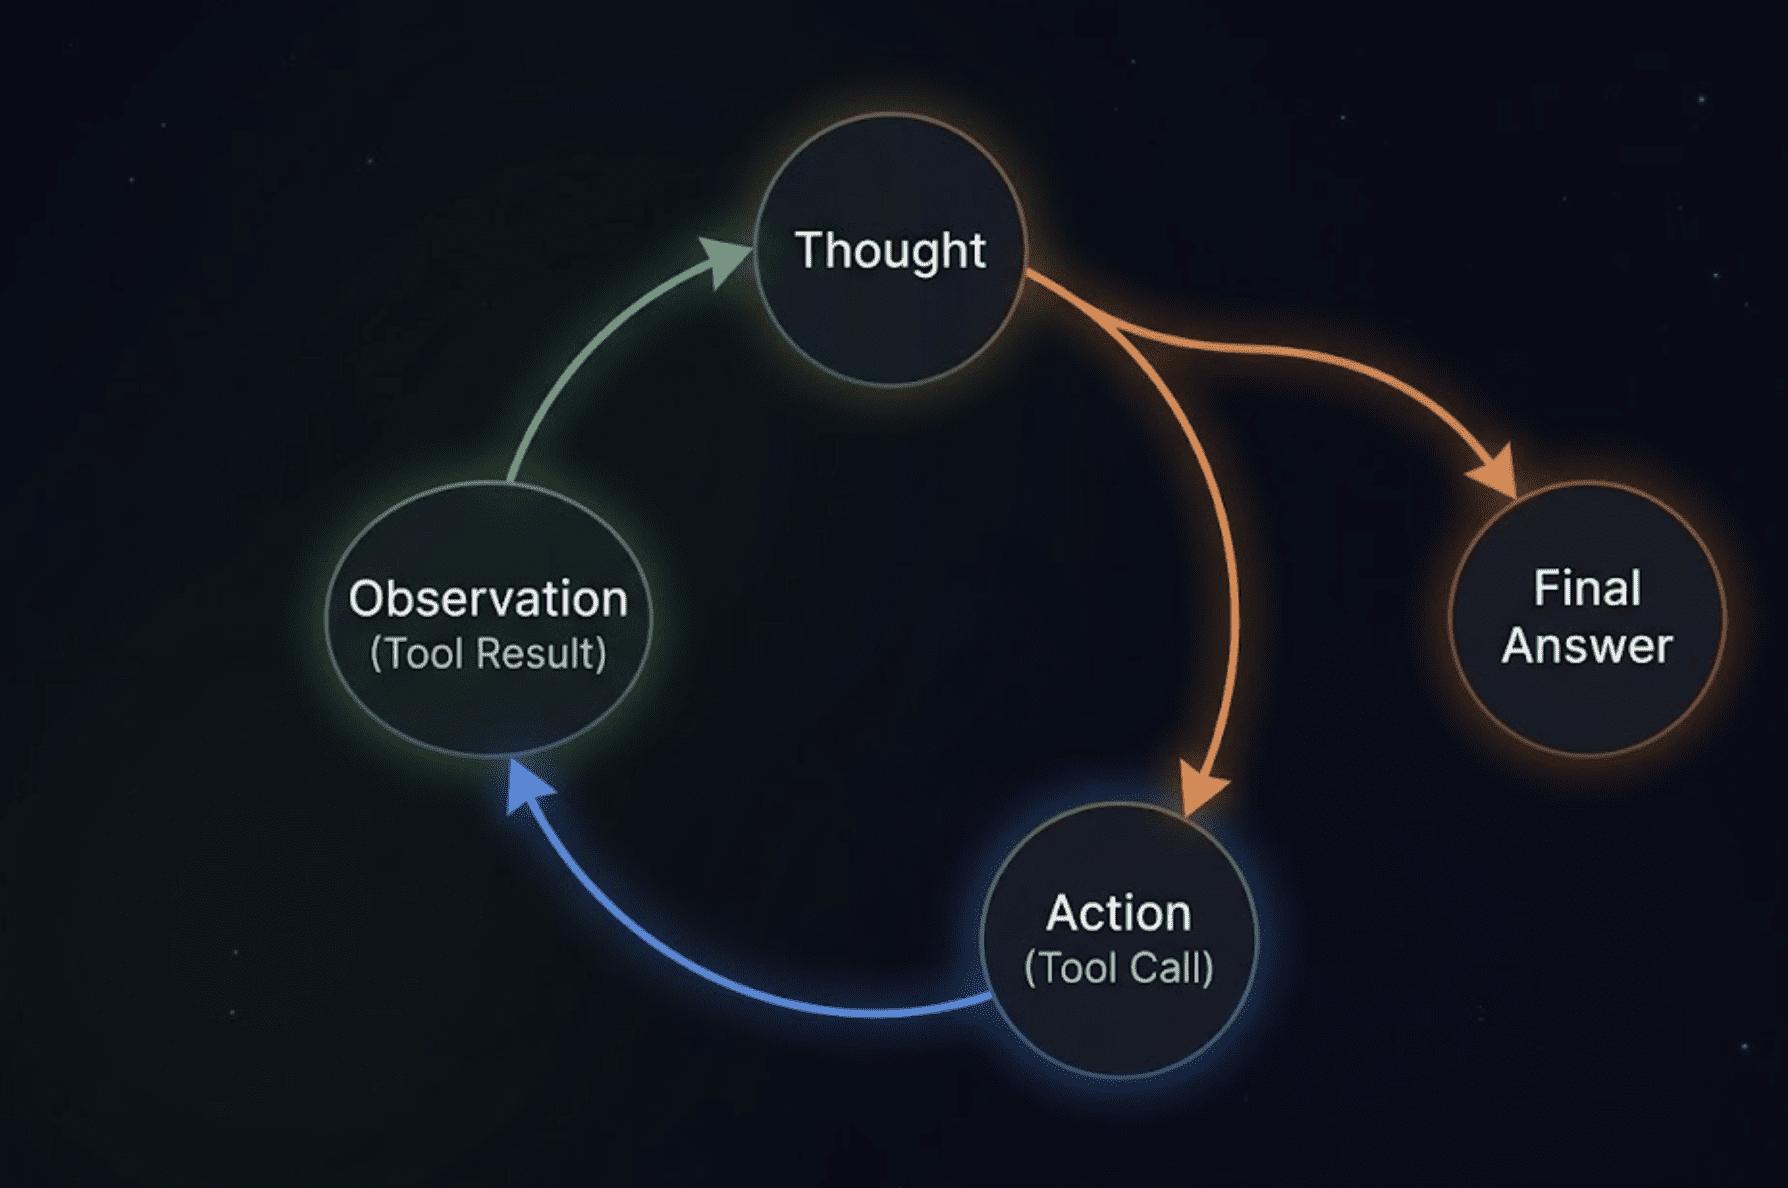
A circular loop diagram showing four labeled stages connected by arrows
Putting it all together, the main run loop:
def chat(user_input: str) -> str:
    """
    Send a message to the assistant and get a response.
    Memory is handled automatically by the agent_executor.
    """
    try:
        response = agent_executor.invoke({"input": user_input})
        return response["output"]
    except Exception as e:
        # Graceful error handling -- tells you what broke without crashing the session
        return f"Something went wrong: {str(e)}. Please try again or rephrase your request."


# Simple command-line interface to run the assistant
if __name__ == "__main__":
    print("Assistant ready. Type 'quit' to exit.\n")
    while True:
        user_input = input("You: ").strip()
        if user_input.lower() in ["quit", "exit", "q"]:
            print("Goodbye.")
            break
        if not user_input:
            continue
        response = chat(user_input)
        print(f"\nAssistant: {response}\n")
What this does: The chat() function is the single entry point for the whole system. You pass it a string, it handles everything — memory retrieval, tool calls, LLM reasoning, error handling — and returns a string. The if __name__ == "__main__" block turns the whole script into a working command-line assistant you can run immediately with python assistant.py.
# Testing and Fixing What Breaks
The first time I ran this, the assistant gave a confident answer that was factually wrong, ignored a tool it should have used, and formatted a response in a way I hated. None of that is unusual. It's not a sign the build is broken — it's the start of the real work.
The most important thing to test early is whether the agent actually uses its tools when it should. A common failure mode is the model trying to answer from memory when it should be searching, because the system prompt didn't make the expectation explicit enough. I fixed this by adding to the system prompt:
When answering questions about recent events, current data, or anything
time-sensitive, always use the web search tool. Do not rely on your
training knowledge for facts that may have changed.
On error handling: this matters more than most tutorials let on. According to research from Mordor Intelligence, nearly half of AI-generated code fails its first security review. The same principle applies to AI-generated responses — output should be treated as a draft, not a final answer, until you've established trust in a particular type of task. The try/except block in the chat() function above is a start, but you'll want to expand it as you discover the specific ways your assistant fails.
For more structured testing, write test cases like this:
# test_assistant.py
# Run these to verify the assistant behaves as expected before deploying

test_cases = [
    {
        "input": "What is the current price of Bitcoin?",
        "expected_behavior": "Should use web search, not answer from memory"
    },
    {
        "input": "Summarize the file at /tmp/test_document.txt",
        "expected_behavior": "Should call the read_file tool"
    },
    {
        "input": "What did I ask you five messages ago?",
        "expected_behavior": "Should reference conversation memory correctly"
    }
]

for case in test_cases:
    print(f"Testing: {case['input']}")
    print(f"Expected: {case['expected_behavior']}")
    result = chat(case["input"])
    print(f"Got: {result[:200]}...")  # Print first 200 characters of response
    print("---")
Run these after any change to the system prompt or tool configuration. Small prompt changes often have surprising downstream effects.
# The Full Code
Everything above has been explained in pieces. Here it is as one complete, copy-paste-ready file. Save it as assistant.py, make sure your .env file is in the same directory, and run it with python assistant.py.
# assistant.py
# Full AI Assistant -- built with LangChain, GPT-4o, DuckDuckGo Search, and SQLite memory
# Requirements: Python 3.10+  |  Run: pip install langchain==0.3.0 langchain-openai
#               langchain-community langgraph duckduckgo-search python-dotenv pydantic requests

import os
from dotenv import load_dotenv
from langchain_openai import ChatOpenAI
from langchain.memory import ConversationBufferMemory
from langchain_community.chat_message_histories import SQLChatMessageHistory
from langchain.agents import AgentExecutor, create_openai_tools_agent
from langchain_community.tools import DuckDuckGoSearchRun
from langchain.tools import tool
from langchain_core.prompts import ChatPromptTemplate, MessagesPlaceholder

# ──────────────────────────────────────────────
# 1. LOAD ENVIRONMENT VARIABLES
# ──────────────────────────────────────────────
# Reads OPENAI_API_KEY from your .env file.
# Never hardcode API keys directly in your source code.
load_dotenv()


# ──────────────────────────────────────────────
# 2. INITIALIZE THE LANGUAGE MODEL
# ──────────────────────────────────────────────
# temperature=0.2 keeps responses focused and consistent.
# Raise it toward 1.0 if you want more creative, varied output.
llm = ChatOpenAI(
    model="gpt-4o",
    temperature=0.2,
    api_key=os.getenv("OPENAI_API_KEY")
)


# ──────────────────────────────────────────────
# 3. DEFINE THE SYSTEM PROMPT
# ──────────────────────────────────────────────
# This is the assistant's standing instruction set.
# It shapes behavior on every single turn -- treat it carefully.
SYSTEM_PROMPT = """
You are a focused, reliable personal assistant.

Your job is to help the user research topics, summarize documents,
draft written content, and handle structured tasks. You always:

- Give direct answers before elaborating
- Say when you're unsure rather than guessing
- Ask for clarification if a task is genuinely ambiguous
- Keep responses concise unless detail is explicitly requested

You have access to web search and can read files the user provides.
When using these tools, always cite where you got your information.

When answering questions about recent events, current data, or anything
time-sensitive, always use the web search tool. Do not rely on your
training knowledge for facts that may have changed.

Do not make up facts, invent citations, or fill gaps with plausible-sounding fiction.
"""


# ──────────────────────────────────────────────
# 4. SET UP PERSISTENT MEMORY
# ──────────────────────────────────────────────
# SQLChatMessageHistory saves conversation history to a local SQLite database.
# This means the assistant remembers context across sessions, not just within one.
# Change session_id to keep separate memory threads (e.g. one per project).
message_history = SQLChatMessageHistory(
    session_id="main_session",
    connection_string="sqlite:///assistant_memory.db"
)

# ConversationBufferMemory wraps the message history and injects it
# into each prompt so the model always has the full conversation context.
# Note: for very long conversations, swap this for ConversationSummaryMemory
# to avoid hitting the model's token limit.
memory = ConversationBufferMemory(
    memory_key="chat_history",
    chat_memory=message_history,
    return_messages=True
)


# ──────────────────────────────────────────────
# 5. DEFINE TOOLS
# ──────────────────────────────────────────────

# Tool 1: Web search via DuckDuckGo -- no API key required
search_tool = DuckDuckGoSearchRun()

# Tool 2: Custom file reader
# The @tool decorator registers this Python function as a callable tool
# that the agent can invoke when the user asks it to read a file.
@tool
def read_file(file_path: str) -> str:
    """
    Reads a text file from the given path and returns its contents.
    Use this when the user asks you to read, analyze, or summarize a file.
    """
    try:
        with open(file_path, "r", encoding="utf-8") as f:
            return f.read()
    except FileNotFoundError:
        return f"File not found: {file_path}"
    except Exception as e:
        return f"Error reading file: {str(e)}"

# Collect all tools into a list -- add more custom tools here as you build them
tools = [search_tool, read_file]


# ──────────────────────────────────────────────
# 6. BUILD THE AGENT
# ──────────────────────────────────────────────

# The prompt template structures every message sent to the model.
# MessagesPlaceholder slots in the memory (chat_history) and the agent's
# internal reasoning scratchpad on each turn.
prompt = ChatPromptTemplate.from_messages([
    ("system", SYSTEM_PROMPT),
    MessagesPlaceholder(variable_name="chat_history"),
    ("human", "{input}"),
    MessagesPlaceholder(variable_name="agent_scratchpad")
])

# create_openai_tools_agent wires together the LLM, the tools, and the prompt
# into a single agent that knows how to decide when and which tools to call.
agent = create_openai_tools_agent(llm, tools, prompt)

# AgentExecutor is the runtime loop.
# It calls the agent, runs any tools it selects, feeds those results back,
# and repeats until it reaches a final answer (or hits max_iterations).
agent_executor = AgentExecutor(
    agent=agent,
    tools=tools,
    memory=memory,
    verbose=True,       # Set to False in production; True shows the reasoning steps
    max_iterations=5    # Prevents the agent from looping indefinitely on hard problems
)


# ──────────────────────────────────────────────
# 7. THE CHAT FUNCTION
# ──────────────────────────────────────────────

def chat(user_input: str) -> str:
    """
    Send a message to the assistant and get a response.
    Memory, tool use, and error handling are all managed here.
    """
    try:
        response = agent_executor.invoke({"input": user_input})
        return response["output"]
    except Exception as e:
        # Returns a readable error message instead of crashing the session.
        # In production, log the full exception here for debugging.
        return f"Something went wrong: {str(e)}. Please try again or rephrase your request."


# ──────────────────────────────────────────────
# 8. COMMAND-LINE INTERFACE
# ──────────────────────────────────────────────

# Run this file directly to start a command-line session: python assistant.py
# To wrap it in a browser UI instead, see Gradio or Streamlit in Part 7.
if __name__ == "__main__":
    print("Assistant ready. Type 'quit' to exit.\n")
    while True:
        user_input = input("You: ").strip()
        if user_input.lower() in ["quit", "exit", "q"]:
            print("Goodbye.")
            break
        if not user_input:
            continue
        response = chat(user_input)
        print(f"\nAssistant: {response}\n")
// Results
After about two weeks of regular use, here's what the assistant actually handles for me now:
- Research synthesis: I give it a topic and three to five URLs, and it pulls the key points into a structured summary. What used to take 45 minutes takes about 4 minutes, with the remaining time spent on my own verification and judgment.
- Draft generation: First drafts of emails, summaries, and structured documents. The output isn't final and I don't expect it to be, but having something to edit is faster than starting from a blank page every time.
- File digestion: I drop meeting notes, PDFs, and log files into a folder and ask it to pull out specific information. It handles this reliably as long as the files are text-based and under about 50,000 words.
The time savings are real. Data from DX's analysis of 135,000+ developers found an average of 3.6 hours saved per week when using AI tools, and daily users showed even larger gains. My experience is in that range for task-heavy days, though it varies a lot by the type of work.
# Wrapping Up
That Tuesday I described at the start — the one where I worked all day and shipped almost nothing — still happens. But it happens less, and when it does, it's rarely because I was stuck in the wrong kind of work. The assistant handles the parts of the job that don't require me specifically, which frees me to spend more time on the parts that do.
What I didn't expect is that building it changed how I think about the work itself. When you're responsible for a tool, you start noticing friction differently. You start asking "could this be delegated?" more consistently, which is a useful mental habit regardless of whether you have AI involved.
The barrier to building something like this is lower than it appears. The full working assistant above is under 150 lines of Python, uses freely available frameworks, and runs on any machine with Python installed. The hardest part is deciding what you actually want it to do — and that question is worth answering carefully, because a focused assistant beats a general one every time.
Start small. Give it one job. Add complexity only when you run out of value at the simpler level. That approach works for tools, and it works for building habits around them.
Shittu Olumide is a software engineer and technical writer passionate about leveraging cutting-edge technologies to craft compelling narratives, with a keen eye for detail and a knack for simplifying complex concepts. You can also find Shittu on Twitter.