 A Simple Starter Guide to Build a Neural Network
 A Simple Starter Guide to Build a Neural Network
This guide serves as a basic hands-on work to lead you through building a neural network from scratch. Most of the mathematical concepts and scientific decisions are left out.
By Jeff Hu, Machine Learning Enthusiast

Image retrieved from https://media.scmagazine.com
You will be able to program and build a vanilla Feedforward Neural Network (FNN) starting today via PyTorch. Here is the python jupyter codebase for the FNN: https://github.com/yhuag/neural-network-lab
This guide serves as a basic hands-on work to lead you through building a neural network from scratch. Most of the mathematical concepts and scientific decisions are left out. You are free to research more on that part.
Getting Started
1. Please make sure you have Python and PyTorch installed in your machine:
- Python 3.6 (installation)
- PyTorch (installation)
2. Check the correctness of Python installations by the commands at console:
python -V
The output should be Python 3.6.3 or later version
3. Open a repository(folder) and create your first Neural Network file:
mkdir fnn-tuto
cd fnn-tuto
touch fnn.py
Start Writing Codes
All the following codes should be written in the fnn.py file
Import PyTorch
It will load PyTorch into the codes. Great! A well beginning is half done.
Initialize Hyper-parameters
Hyper-parameters are the powerful arguments that are set up upfront and will not be updated along with the training of the neural network.
Download MNIST Dataset
MNIST is a huge database with tons of handwritten digits (i.e. 0 to 9) aims for the usage of image processing.
Load the Dataset
After downloading the MNIST dataset, we load them into our codes.
Note: We shuffle the loading process of train_dataset to make the learning process independent of data order, but the order of test_loader remains to examine whether we can handle unspecified bias order of inputs.
Build the Feedforward Neural Network
Now we have our datasets ready. We will start building the neural network. The conceptual illustration can be viewed as below:
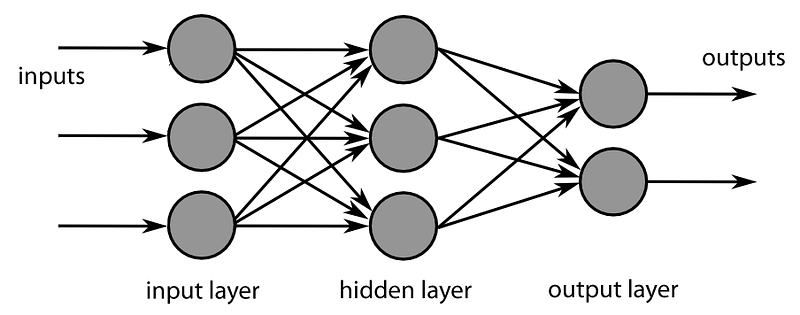
FNN image retrieved from http://web.utk.edu/
Feedforward Neural Network Model Structure
The FNN includes two fully-connected layers (i.e. fc1 & fc2) and a non-linear ReLU layer in between. Normally we call this structure 1-hidden layer FNN, without counting the output layer (fc2) in.
By running the forward pass, the input images (x) can go through the neural network and generate a output (out) demonstrating how are the likabilities it belongs to each of the 10 classes. For example, a cat image can have 0.8 likability to a dog class and a 0.3 likability to a airplane class.
Instantiate the FNN
We now create a real FNN based on our structure.
net = Net(input_size, hidden_size, num_classes)
Enable GPU
Note: You could enable this line to run the codes on GPU
# net.cuda() # You can comment out this line to disable GPU
Choose the Loss Function and Optimizer
Loss function (criterion) decides how the output can be compared to a class, which determines how good or bad the neural network performs. And the optimizer chooses a way to update the weight in order to converge to find the best weights in this neural network.
criterion = nn.CrossEntropyLoss()
optimizer = torch.optim.Adam(net.parameters(), lr=learning_rate)
Training the FNN Model
This process might takes around 3 to 5 minutes depending on your machine. The detailed explanations are listed as comments (#) in the following codes.
Testing the FNN Model
Similar to training the neural network, we also need to load batches of test images and collect the outputs. The differences are that:
- No loss & weights calculation
- No wights update
- Has correct prediction calculation
Save the trained FNN Model for future use
We save the trained model as a pickle that can be loaded and used later.
torch.save(net.state_dict(), ‘fnn_model.pkl’)
Congrats. You have done building your first Feedforward Neural Network!
What’s Next
Save and close the file. Start running the file at the console:
python fnn.py
You will see the training process going like the following:

Thanks for your time and hope you enjoy the tutorial. All the codes can be found here!
Credit: The codes are heavily and thankfully based on yunjey’s great codebase. ❤
Bio: Jeff Hu (Github) is a Taiwanese machine learning enthusiast and blockchain developer. He focuses on Natural Language Processing and Deep Learning at work and is a magician and poet at leisure.
Original. Reposted with permission.
Related:
- Today I Built a Neural Network During My Lunch Break with Keras
- PyTorch or TensorFlow?
- 7 Steps to Mastering Deep Learning with Keras