 Data Scientist guide for getting started with Docker
 Data Scientist guide for getting started with Docker
Docker is an increasingly popular way to create and deploy applications through virtualization, but can it be useful for data scientists? This guide should help you quickly get started.
Introduction
Docker is an increasingly popular tool designed to make it easier to create, deploy and run applications within a container. Containers are extremely useful as they allow developers to package up an application with all the parts it needs, such as libraries and other dependencies, and ship it all out as one package. It’s commonly used by software engineers, but how can Data Scientist’s get started with this powerful tool? Well, before we get into the guide for getting started, let’s discuss some of the reasons you may want to use Docker for Data Science.
Why Docker?
Reproducibility
One of Docker’s biggest draws is its reproducibility. Aside from sharing the Docker image itself, you could in theory share a python script with the results baked inside the Docker. A colleague could then run this to see for themselves what’s in the Docker image.
Time
You can save a lot of time as you don’t have to install the individual packages as they’re all contained within the Docker image itself. Furthermore, a Docker container’s start time to boot up is around 50ms, significantly quicker than running a more traditional virtual machine.
Flexibility
It’s an extremely flexible tool because you can quickly run any software that has a Docker image created in the Docker library.
Build Environment
Docker is useful for testing a build environment before you host it on the live server. You can configure the Docker container to be the same as the server’s environment, making it easy to test.
Distribution
Data scientists can spend hours preparing their machines to accommodate a specific framework. For example, there are 30 + unique ways for someone to setup a Caffe environment. Docker provides a consistent platform to share these tools, reducing the time wasted in searching for operating system specific installers and libraries.
Accessibility
The Docker eco-system – docker compose and docker machine – make it easily accessible for anyone. It means that a member of the company who isn’t familiar with the code inside it can still run it. Perfect for members of the sales team, or higher management to show off that new data science application you’ve been building!
Getting Started
Hopefully we’ve managed to sell to you the benefits of using Docker, so now it’s time to get started. First off, you’ll need to head over to the Docker site to install a version of the software.
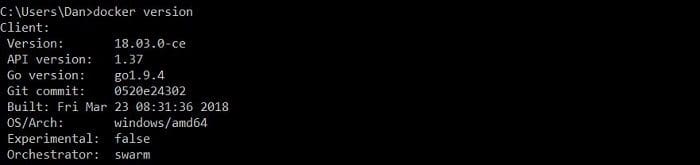
To ensure it’s been installed correctly, open the command line and type docker version. This should display something like the below:
Now we’ve got Docker installed, lets investigate a relatively straight-forward, common example:
docker run -p 8000:8000 jupyter/notebook
It looks a little daunting to someone new to Docker, so let’s break it down:
docker run – this command finds the image (which in this example is jupyter notebook), loads up a container and then runs a command in that container.
-p 8000:8000 – the ‘p’ keyword stands for port and so this part of the command is opening up the ports between the host and the container, in the format -p <host_port>:<container_port>.
jupyter/notebook – the image to be loaded in. Away for Jupyter notebook, you can browse the official Docker library for thousands of the most popular software tools out there.
Once you’ve ran this command and navigated to http://localhost:8000/, you should see the below:

Pretty easy, right? When you consider that you’d normally have to download Python, the runtime libraries and the Jupyter package, running this through Docker is extremely efficient.
OK, now that’s up and running let’s dive into sharing Jupyter notebooks between the host and the container. Firstly, we need to create a directory on our host machine that will store the notebooks, we’ll call it /jupyter-notebooks. Sharing directories when running the Docker command is similar to how the ports work and we need to add the following:
-v ~/jupyter-notebooks:/home/joyvan jupyter/notebook
So, what we’re doing here is mapping <host_directory>:<container_directory> (e.g. ~/jupyter-notebooks on the host, to /home/joyvan on the container). This container directory comes from the Jupyter Docker documentation as the specified working directory for this type of image.
Combining this with what we were running before, the full command should like this:
docker run -p 8000 :8000 -v ~/jupyter-notebooks:/home/joyvan jupyter/notebook
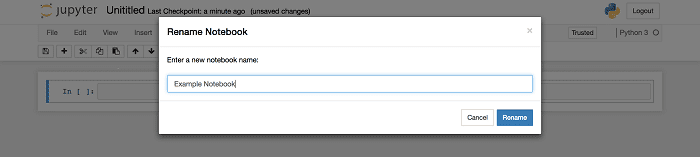
Now simple load up the localhost server, create a new notebook and rename it from Untitled to ‘Example Notebook’. Finally, check your local machines ~/jupyter-notebooks directory and you should see: Example Notebook.ipynb. Voila!
Dockerfile
A Dockerfile is a text document that contains commands that can be used to create a Docker image automatically. It’s an effective way of saving Docker commands and executing them in succession through the Docker build /path/to/dockerfile command.
The Dockerfile for our Jupyter notebook example above would look like the below:
FROM ubuntu:latest
RUN apt-get update && apt-get install -y python3 \ python3-pip
RUN pip3 install jupyter
WORKDIR /home/jupyter
COPY  /src/jupyter ./
EXPOSE 8000
ENTRYPOINT ["jupyter", "notebook", "--ip=*"]
Now, let’s discuss each part:
FROM ubuntu:latest
This tells Docker what the base should be for the new image, in this case ubuntu. The :latest simple grabs the latest version. You can enter in a version number instead if you’re trying to test an older version.
RUN apt-get update && apt-get install -y python3 \ python3-pip
This line ensures the system is up-to-date and then installs python3 and pip3.
RUN pip3 install jupyter
This then installs Jupyter.
WORKDIR /home/jupyter
COPY /src/jupyter ./
Sets the working directory on the Docker image container and then copies the files you want from your local host over.
EXPOSE 8000
Similar to how -p worked earlier, this exposes port 8000.
ENTRYPOINT ["jupyter", "notebook", "--ip=*"]
Starts Jupyter notebook.
Dockerfile’s are extremely useful as they allow other team members to run a Docker container with ease.
Conclusion
As you can see, we managed to get a working use case for Docker with data science up and running very quickly. We barely scratched the surface with what you could do, but thanks to Docker’s fantastic library, the possibilities are endless! Becoming a master at Docker can not only assist you with local development, but can save a vast amount of time, money and effort when working with a team of data scientists. Stay tuned to KDnuggets, as we’ll be posting a Docker Cheat Sheet article very soon.
Related: